- Data Recovery
- Data Recovery for PC
- Data Recovery for Android
- Data Recovery for iPhone/iPad
- Unlock For Android
- Unlock for iPhone/iPad
- Android System Repair
- iPhone/iPad System Repair
Updated By Soha On Nov 5, 2025, 2:51 pm
Accidentally emptying the Recycle Bin and losing important files is indeed worrying. But please rest assured that there is nothing we can do about it. In fact, in most cases, files deleted from the Recycle Bin do not disappear permanently immediately - as long as they are handled properly, there is still a great chance that they can be retrieved. By taking advantage of the built-in tools of the Windows system or some free techniques, you have a chance to successfully recover files. In this guide, we will systematically introduce several effective file recovery methods, including using file recovery tools, backing up file history, and Windows backup features, etc.
In fact, when you delete a file from the Recycle Bin, the system does not immediately erase it from the disk but merely marks the space occupied by the file as "reusable". Before the operating system writes new data to overwrite these Spaces, the original file data remains on the disk. This means that as long as action is taken promptly and no large amount of new data is written to the drive after the files are deleted, it is usually feasible to recover these files.
However, the success rate of file recovery is influenced by multiple factors, and the following points are particularly crucial:
1. Disk usage: After a file is deleted, any operation written to this drive - such as downloading files, installing software or running system updates - may occupy the released space, resulting in the file being overwritten.
2. Time factor: The longer a file is deleted, the higher the risk of it being overwritten by new data.
3. Storage device type: For solid-state drives (SSDS) that support TRIM function, the system may clean up deleted data more quickly, making their recovery more difficult than that of traditional mechanical hard drives (HDDS).
4. System activities: The system's automatic updates, indexing services, or other background processes may invisibly write data, thereby overwriting the area where deleted files are located.
5. Drive health status: If the disk itself has bad sectors or hardware failures, it will further reduce the possibility of data recovery.
6. File size: Generally, smaller files are easier to be fully recovered; However, large files may be partially overwritten, and their integrity recovery will be affected.
7. Degree of file fragmentation: If a file is stored in multiple fragments on the disk, the difficulty of its recovery will increase significantly.
8. Selection of recovery tools: Different recovery tools have varying scanning depths and algorithms. Some can perform more thorough scans, and thus have relatively higher success rates.
When important files are accidentally deleted from the Recycle Bin, there is no need to panic too much. As long as the correct methods are adopted and the best opportunities are seized, most documents, photos, videos and other files have the chance to be successfully restored.
For most users, professional data recovery software is the most efficient and convenient choice. Geekersoft Data Recovery is a comprehensive artificial intelligence recovery tool that can handle various data loss scenarios, including formatting. This software supports over 1,000 file formats, covering common images (JPG, RAW, PNG, etc.), videos (MP4, MOV, AVI, etc.), office documents (Word, Excel, PPT, etc.) and compressed packages, and is compatible with SD cards, USB flash drives, external hard drives and even computers with system crashes. The specific operation steps are as follows
Step 1 Visit the official website of Geekersoft Data Recovery, download and install the software. Please note that it must be
installed on the computer's system drive (such as the C drive), rather than on a formatted storage device, to prevent the original data from being overwritten.
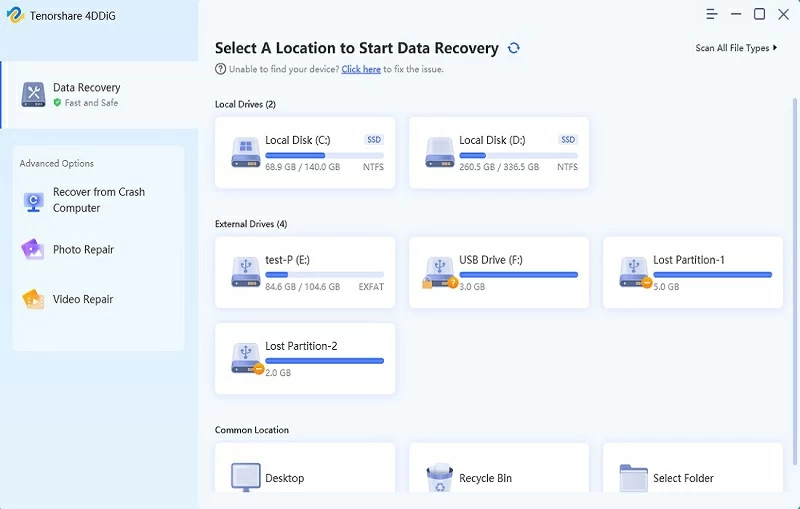
Step 2 Start the software and on the main interface, select the disk or partition where the file was originally located (i.e., the original location corresponding to the emptied Recycle Bin).
Step 3 Click the "Scan" button. The software will automatically analyze the selected location and conduct a deep search for recoverable file traces. After the scanning is completed, you can
precisely locate the files that need to be recovered by file type, path or by directly previewing the content.
Step 4 Select the target file, click the "Restore" button, and save it to a new safe location (such as the desktop or another hard drive). Do not save it back to the original disk.
If you prefer to operate via the command line, Windows File Recovery, a free tool provided by Microsoft officially, is also a feasible option. This tool can be obtained through the Microsoft Store and offers two basic recovery modes, suitable for recovering files from built-in hard drives, external devices or USB drives. The specific operation steps are as follows
Step 1 Search and download "Windows File Recovery" from the Microsoft Store.
Step 2 After opening the application, the system will automatically pop up a command Prompt window.
Enter the recovery command
The basic format of the command is:
winfr source disk letter: Target disk letter: [/ Mode] [/ Switch
For example, if you need to search for all PDF files from drive C and restore them to drive D in regular mode, you should enter:
winfr C: D: /regular /n *.pdf
Step 3 After the command is run, the program will prompt you to enter Y to confirm the start of the recovery process. Please wait patiently until it is completed.
If a backup was created through the Windows backup function before the file was deleted, you can also recover the lost data from it. This method is applicable when the entire folder or drive has been backed up in advance. The specific operation steps are as follows
Step 1 Connect the external disk with the backup to your computer, or ensure that you have access to the network location where the backup is located.
Step 2 Enter "Control Panel" > "System and Security" > "Backup and Restore (Windows 7)" in sequence.
Step 3 Click "Select Another Backup to restore Files" (such as restoring on another computer), or directly select an existing backup.
Step 4 To find the required data, you can click "Browse Files" or "Browse Folders" to locate in the backup content. Select the files or folders you want to restore and click "Next".
Step 5 Select to restore the file to its original location or specify a new folder for storage.
If the "File History" feature of Windows was enabled before the file was deleted, the file can be quickly restored through this function. File history records can automatically back up the contents of user folders (such as documents, pictures, desktops, etc.) and save multiple historical versions of them, providing convenience for data recovery. The operation steps are as follows:
Step 1 Open "File Explorer" and enter the folder where the deleted file was originally located.
Step 2 Right-click on the folder (if the file is located in the root directory of the drive, right-click on the corresponding drive, such as the C drive), and select "Restore Previous Version" from the menu.
Step 3 In the pop-up properties window, switch to the "Previous Versions" TAB. The system will list the available versions saved by the file history.
Step 4 Select a version of the file before deletion. You can click "Open" to preview it or directly click "Restore" to restore the file to its original location.
Warm Reminder: If you want to avoid overwriting the current file, click the drop-down arrow next to "Restore" and select "Restore to..." Then specify a new storage location.
Although mastering file recovery skills is very practical, taking proactive measures to avoid the risk of data loss is even more important. The following are some effective data protection strategies that can help you minimize the possibility of files being accidentally and permanently deleted.
Step 1 By rationally configuring the Recycle Bin properties, a longer buffering time can be provided for deleted files:
Step 2 Right-click the "Recycle Bin" icon on the desktop and select "Properties".
Step 3 In the pop-up window, you can adjust the maximum storage space of the Recycle bin for different drives.
Step 4 Be sure to uncheck "Do not move files to the Recycle Bin..." Options to ensure that files can first enter the Recycle Bin when deleted, providing you with a second chance for confirmation.
The storage-aware feature of Windows will automatically clean up temporary files such as the Recycle Bin at regular intervals, which may cause unexpected data loss
Step 1 Go to "Settings" > "System" > "Storage".
Step 2 Click on the "Storage Awareness" configuration option. It is recommended to directly disable this function or at least adjust its operating frequency to a longer period such as "monthly" to reduce the risk of automatic deletion.
The system may automatically perform cleaning operations through preset tasks:
Step 1 Search for "Task Scheduler" in the Start menu and open it.
Step 2 Expand "Task Scheduler Library" > "Microsoft" > "Windows" in sequence.
Step 3 focuses on tasks related to "StorageDiagnostic" or "RetailDemo". For tasks that may trigger cleanup operations, you can right-click and select "Disable" to suspend their automatic operation.
Be vigilant when performing batch file operations
Before deleting, be sure to confirm the file content, especially when using the "Shift + Delete" key combination.
It is recommended to first move the files to be deleted to the Recycle Bin, observe them for a period of time, and then empty them to avoid deleting them permanently directly.
Set up multiple protections for important data. A complete backup plan can ensure that even if the Recycle bin files are cleared, there is still a safe and reliable copy of the data. If the "File History" or "Backup & Restore" functions that come with Windows are enabled. Real-time synchronization is achieved by combining the use of cloud storage services such as OneDrive and Google Drive. Regularly back up key files to an external hard drive or network storage device.
Whether it's a Windows computer or a Samsung phone, emptying the Recycle Bin doesn't mean permanent data loss. The key lies in taking prompt action and choosing the right recovery tool. For instance, for the Windows system, you can give priority to trying the built-in tools such as "File History", "Windows Backup" or "Windows File Recovery". For Android devices like Samsung, the Android version of Geekersoft Data Recovery, with its high success rate and wide compatibility, has become a highly recommended professional choice.
In addition, we strongly recommend that you develop the habit of regular backups during daily use and be cautious when performing batch deletion operations. In the event of data loss unfortunately, please stop using the device immediately and try to restore it as soon as possible following the instructions in this article.