- Data Recovery
- Data Recovery for PC
- Data Recovery for Android
- Data Recovery for iPhone/iPad
- Unlock For Android
- Unlock for iPhone/iPad
- Android System Repair
- iPhone/iPad System Repair

Updated By Soha On Jul 15, 2026, 9:12 pm
Many iPhone users have encountered similar situations - whether the iOS device gets stuck in recovery mode during either failed updates or daily troubleshooting. If you are also facing this problem, then you mustn't miss this article. As long as the correct method is mastered and patience is maintained, this problem can be completely solved. Read this article carefully and we will guide you step by step to easily get out of the recovery mode. You can get your device back to normal use without any professional background or complex tools.
iPhone Recovery mode is a built-in system repair feature of iOS devices, specifically designed to address system issues at the software level. After enabling, you need to connect your iPhone to your computer and complete the troubleshooting through iTunes (use "Finder" for macOS Catalina and above systems). After entering this mode, the device will temporarily shut down the regular operating system. The screen will display the ICONS of the data cable and the computer, prompting the connection operation. However, the recovery mode is not a daily use function and is only applicable when the system experiences a serious failure. If the device gets stuck in this mode unexpectedly and cannot exit, it will cause inconvenience in use. At this point, you need to know how to exit the recovery mode.
Before learning how to exit the recovery mode, let's first understand in what circumstances an iPhone resumes entering this mode. Sometimes the equipment will automatically enter due to system failure. In some cases, we will also proactively put it in recovery mode to fix the problem.
To manually enter the recovery mode of your iPhone, please follow these steps:
Step 1 Connect your iPhone to your computer using a USB data cable and make sure the latest version of iTunes (or "Finder" on macOS) is installed on your computer. Then launch iTunes or Finder.
Step 2 Depending on your device model, force a restart as follows:
- iPhone 8 or later models (including the 2nd generation iPhone SE) :
Quickly press the "Volume +" key, then press the "Volume -" key, and hold down the side button for a long time until the screen displays "Connect to iTunes".
- iPhone 7/7 Plus/iPod touch (7th generation) :
Press and hold the side key and the volume down key simultaneously until the "Connect to iTunes" screen appears.
- iPhone 6s or earlier models/iPod touch (6th generation or earlier) :
Press and hold the Home key and the top (or side) button simultaneously until the screen displays "Connect to iTunes".
Step 3 At this point, iTunes or Finder will detect the iPhone in recovery mode and pop up the corresponding prompt.
When the iPhone gets stuck in recovery mode, the Geekersoft System Repair (iOS) offers a simple and reliable solution. You only need to click the mouse a few times to solve the problem of device freezing with its "System Repair" and "Advanced Repair" functions, without going through a complicated process.
Among them, the standard mode can fix system issues while retaining all data. The advanced mode is designed to solve more complex problems (please note that this mode may clear the data).
Compared with other methods of exiting the iPhone recovery mode, Geekersoft System Repair (iOS) can solve the problem without losing any data, and its security is at its peak. In addition to exiting the recovery mode, it can also fix over 150 kinds of iOS system faults, be compatible with all series of devices such as iPhone, iPad and iPod touch, and be compatible with all iOS versions. It is highly practical. More importantly, the system repair software is user-friendly throughout, requiring no professional technical knowledge. Even ordinary people can easily get started with it. The specific operation steps are as follows
Step 1 Download and install Geekersoft iOS System Repair(ReiBoot) on your computer. After starting it, go to the "Toolbox" and select the "System Repair" function.
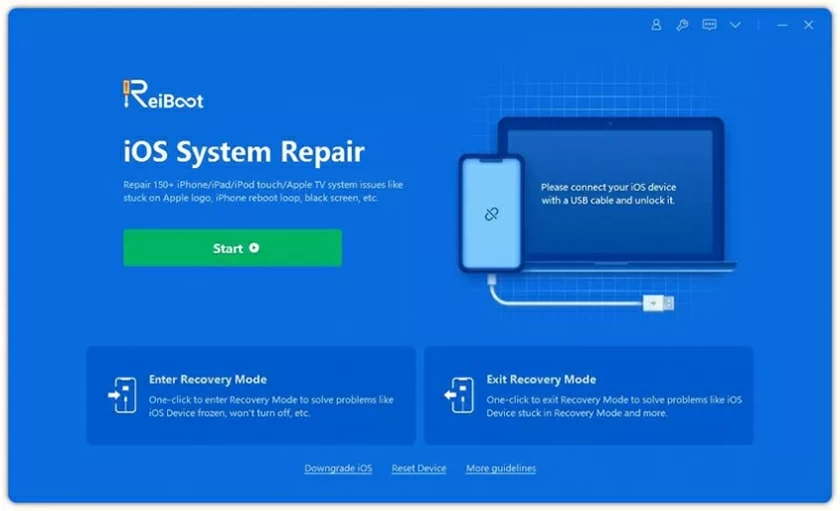
Step 2 Connect the iOS device to the computer with a USB data cable. After the software recognizes it, select "iPhone" in the new window that pops up and click Continue. After entering the next step, select "iOS Repair" from the option list to advance the operation of exiting the recovery mode.
Step 3 After confirming that the data cable icon is displayed on the device screen, the "Exit Recovery Mode" option will appear on the software interface. Select it and click "Continue". Then click "Exit Recovery Mode". After the process is completed, the device will automatically restart and resume normal use.
When an iPhone is stuck in recovery mode, using iTunes for recovery is an effective solution. This method will reinstall the iOS system and fix software malfunctions, but it should be noted that it will clear all data on the device. Therefore, we suggest making it the last resort. The specific operation steps are as follows
Step 1 Connect your iPhone to your computer using a USB data cable and open iTunes (or "Finder" on macOS Catalina or later systems).
Step 2 Ensure that your iPhone is in recovery mode (for specific entry methods, please refer to Part 2).
Step 3 After iTunes/ Finder detects the device, an options window will pop up. Please select "Restore".
After confirming the operation in Step 4, iTunes will start downloading and installing the latest iOS version. After the process is completed, the device will automatically restart and enter the initial Settings interface.
The Geekersoft System Repair (iOS) tool enables you to rescue important data even when your iPhone is in recovery mode. It can extract various file types including information, contacts and photos, ensuring that valuable data is retained to the greatest extent during the restoration process. The specific operation steps are as follows
Step 1 After starting the program, enter the "Toolbox" and select the "iOS" option under "Data Recovery".
Step 2 Connect the device. The program will automatically recognize the iPhone in recovery mode. Select the type of data you need to recover and click "Start Scan".
Step 3 During the scanning process, you can preview the found content in real time. After completion, precisely select the files to be restored through the filtering tool, then click "Restore to
Computer" and choose the save path to complete the process.
The Geekersoft System Repair (iOS), with its precise recovery capabilities and intuitive operation interface, is an ideal choice for handling such situations.
To exit the iPhone recovery mode, you can refer to the two options provided in this article: one is to manually restore through iTunes (which will clear the data), and the other is to use the Geekersoft System Repair (iOS) tool (which is safer and more convenient). If you want to restore your device to normal efficiently and safely while also taking data protection into account, Geekersoft System Repair (iOS) is undoubtedly a wise choice. This tool supports both Windows and Mac systems. With its one-stop functions, Geekersoft System Repair (iOS) provides you with a comprehensive iOS device maintenance solution. Download and experience it now to easily solve all kinds of iOS system problems!