- Data Recovery
- Data Recovery for PC
- Data Recovery for Android
- Data Recovery for iPhone/iPad
- Unlock For Android
- Unlock for iPhone/iPad
- Android System Repair
- iPhone/iPad System Repair
Updated By Cameron On Dec 29, 2025, 9:04 pm
Apple provides users with high-end electronic products and after-sales services, earning high praise from users all over the world and establishing deep trust with them. However, for users of electronic products, it is inevitable to encounter minor bugs during use. For instance, some iPhone users have reported that when using iOS flagship products such as iPhone and iPad, their devices sometimes unexpectedly fall into DFU mode. If you are also facing an iPhone stuck in DFU (Device Firmware Upgrade) mode and are looking for a solution, then you definitely don't want to miss this article.
The DFU mode is a specific underlying hardware interface for Apple devices (iPhone, iPad, iPod touch). Its full name is Device Firmware Upgrade, that is, the forced upgrade and downgrade mode of device firmware. In simple terms, it can bypass the current operating system and establish the most basic communication with iTunes or Finder on the computer, thereby allowing users to directly read and write the complete firmware of the device.
When an iPhone or iPad is in DFU mode, its screen will turn black and the device cannot be started or used normally. However, users can connect it to iTunes (or Finder) on their computers via a USB data cable. Generally speaking, this mode is mainly used for the repair or downgrade of the underlying system. If it gets stuck unexpectedly, it may cause the device to be unable to be used normally. However, this problem can mostly be solved smoothly and will not cause irreversible damage to the equipment. Now, let's take a look together at how to safely exit the DFU mode and restore the device to normal. In addition, if necessary, recover the lost data on the device.
For electronic products, when encountering minor issues caused by temporary malfunctions, such as a black screen, we suggest that you first try a forced restart. That is to say, when your iPhone goes black in DFU mode, trying to force a restart might help you solve the problem. This operation is designed to interrupt the current abnormal state and reboot the system. The specific
operation varies by model. Please refer to and follow
- iPhone 8, iPhone SE (second generation) and newer models:
Quickly press and release the volume up button. Then, quickly press and release the volume down button. Next, hold down the side button for a long time until the Apple logo appears on the screen and then release it.
- iPhone 7 and iPhone 7 Plus:
Press and hold the side button and the volume down button simultaneously until the Apple logo appears on the screen, then release them.
- iPhone 6s, iPhone SE (first generation) and earlier models:
Press and hold the side button (or top button) and the home screen button simultaneously until the Apple logo appears on the screen, then release them.
With the help of third-party professional tools, your iPhone can exit the DFU mode. Geekersoft iOS System Repair supports various models of iOS devices, including iPhone (iPhone 4-iPhone 17), iPad (iPad mini 3-iPad Pro), iPod (iPod touch 4-iPod touch 4), etc. And it is compatible with both Windows and macOS systems. This method is suitable for users who wish to fix system issues while ensuring that the existing data on their mobile phones is not lost. The main advantage of Geekersoft iOS System Repair lies in its "Standard Mode", which can attempt to fix system faults that cause the device to get stuck in DFU mode without erasing the device content. Specifically, the Geekersoft iOS System Repair enables users to select the "Standard Mode" for repair without losing data. In theory, all existing data within the device can be retained. This tool combines system repair and data recovery functions, making it very practical.
To fix the exit of DFU mode with the Geekersoft iOS System Repair, you can refer to the following operation steps.
Step 1 Install and launch Geekersoft iOS System Repair on your computer, and connect your iPhone to the computer using a USB data cable.
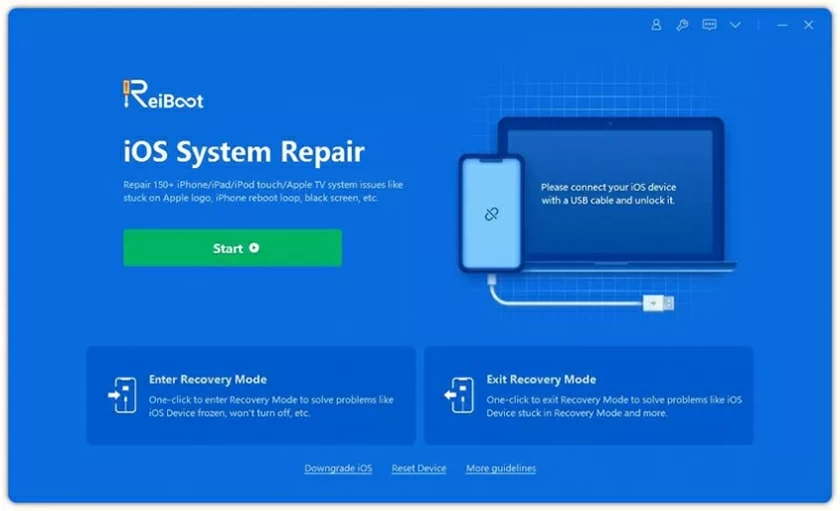
Step 2 After it automatically recognizes your device, select the "iOS System Recovery" function on the main interface, and then click "Standard Mode". This mode is specifically designed to fix system issues and retain data.
Step 3 This repair tool will detect the device model and recommend a verified official firmware package. Please confirm that the information is correct and then click "Download". It is recommended to keep the network stable until the download is complete.
Step 4 After the firmware is downloaded, click the "Start Repair" button. The Geekersoft iOS System Repair will automatically perform the system repair. During this period, please keep the device connection stable until the repair is completed.
The device firmware can be fully restored to the latest official version using iTunes/Finder, allowing users to use the device without any obstacles. The main advantage of this method is that it is official and authoritative. However, the result is that when the iPhone gets stuck in DFU mode, all the data on the device will be cleared. The specific operation steps are as follows.Step 1 Connect your iPhone to the computer using a USB data cable. On the screen, display the icon of the data cable connected to iTunes. Then, manually place it in recovery mode according to the iPhone model:
- iPhone 8 and later models: Quickly press the volume up button once, then press the volume down button once, and then long press the side button until the recovery mode interface appears.
- iPhone 7/7 Plus: Press and hold the side button and the volume down key simultaneously.
- iPhone 6s and earlier models: Press and hold the side button (or top button) and the home screen button simultaneously.
Step 2 According to the prompts, directly click the "Restore" button (Note: Do not click "Update", as the update may not solve the deep-seated fault).
Step 3 The software will automatically download the latest iOS firmware and start the recovery process. Please keep the device connected stably. After the restoration is completed, the iPhone will automatically restart.
The above are the three methods we have introduced to you for fixing an iPhone stuck in DFU mode. Among them, forced restart is the preferred zero-risk option, used to address temporary lag or misoperation. If it is ineffective and you wish to retain the data as much as possible, you can use a third-party tool for targeted repair. In theory, it can preserve the data, but it is still recommended to back it up before operation. If the problem is stubborn or data reset is acceptable, you should use the official iTunes/Finder recovery method. This is the most authoritative and thorough repair solution provided by Apple, but it will clear all the data on the device. You can make a choice among convenience, data security and thoroughness of repair based on the severity of the problem and your own need for data retention.