- Data Recovery
- Data Recovery for PC
- Data Recovery for Android
- Data Recovery for iPhone/iPad
- Unlock For Android
- Unlock for iPhone/iPad
- Android System Repair
- iPhone/iPad System Repair
Updated By Amy On Apr 15, 2023, 4:01 pm
In today's work environment, everyone is not unfamiliar with USB drives. Another name for a USB drive or universal serial bus is also known as a flash drive. This is a portable data storage device with a USB interface, which is much smaller than a compact disc. Any type of data such as video, audio, pictures, compressed files, Word, PDF, and Excel documents can be stored on a USB drive. Currently, 2TB (Tera Byte) flash drives are the largest in terms of storage capacity.
USB drives are portable, economical and compatible, so they are widely used for data transmission on various electronic devices, major social media and network platforms. Its ability to store, transmit and copy data has made it one of the world's most consumed electronic devices. In addition, you can boot your Mac from this USB drive. Isn't that a surprise? If you want to know how to boot a Mac from a USB drive, don't miss the following content.
Product recommendation: Data Recovery
The most direct reason for starting a Mac from USB may be that it cannot be started properly. Choosing to boot from USB is an effective solution when a Mac computer cannot be accessed. This method launches the Mac from USB and returns control of the device to the user. Using external sources such as USB drives allows users to access data from internal drives, as long as the data is in a secure and undamaged state. This approach can also help users repair Mac disks using disk tools and other tools.
Specifically, the main reasons to boot a Mac from USB are as follows:
Install different versions of macOS.
Test the new version before deciding to upgrade.
Support for risk-free testing of Beta releases.
Install older versions via USB to run some applications that are not compatible with the latest macOS.
To ensure the security of your Mac device and your data, we recommend that you make the following preparations.
Use a safe and reliable USB drive from a well-known brand.
The USB device should have at least 16-32GB of free space.
Scan USB drives with a reputable antivirus software.
Check the port size on the Mac. The 12' Mac contains only one type C port.
Buy a C-port USB drive.
Use a drive that supports USB 3.0 and is 16GB or larger for fast data transfer.
Format the USB drive using a supported GUID partition.
The USB device must include an OS X installer or a working operating system.
No matter what operating system you are using, you can boot the device according to the general guidelines above. Below we'll show you how to create a bootable USB drive on a Mac.
Guide to creating a bootable USB through the Terminal
Using the Terminal feature on a Mac is the easiest and most effective way to create a bootable USB drive.
Terminal on Mac is the default gateway of the command line, which functions similar to the command prompt function of MS Windows. By typing commands, the computer can do what it's supposed to do, eliminating the need for traditional pointing and clicking, giving Mac users a faster experience. Go to Mac > Applications > Utility > Terminal, or look for Terminal in the Finder utility.
Creating a bootable USB drive through a terminal requires only the following simple steps: use the MyVolume section of the drive name rename command to change the name of the drive.
After enabling the terminal function, perform the following steps to create a bootable USB drive.
Step 1 Copy and paste the commands applicable to MacOS Mojave into the terminal window. The specific command is as follows: sudo/Applications/Install macOS Mojave. app/Contents/Resources/createinstallmedia -- volume/Volumes/MyVolume.
Step 2 Press Enter to confirm the input.
Step 3 Enter the password.
Step 4 Enter Y and press the Return key to confirm erasing the USB drive. The terminal will execute the command to erase all data in the drive and create a bootable USB drive.
Tip: If you are using another version of the operating system, then you need to replace the above underlined command with the corresponding version of the operating system. For example, if you want to install Mac OS Sierra instead of Mojave, replace "Mojave.app" with "Sierra.app" on the command line.
After creating a bootable USB drive through the above steps, the critical moment has arrived. You only need to insert the created drive into the open port on the Mac to start the Mac.
To start a Mac from a USB flash drive, refer to the following steps:
Step 1 Turn on the Mac system power.
Step 2 When the Mac starts, press and hold the Option (Alt) key on the keyboard.
Step 3 In the options in the pop-up window, select the USB drive as the startup disk, and the system will start the startup process from the USB drive.
Step 4 Finally, you can install the operating system from the MacOS utility, and you can use the Mac computer normally.
Tip: You can restore data using the Time-Machine backup option.
If a Mac encounters issues such as system update failures, system crashes, MBR corruption, or drive corruption, it can cause the firmware BIOS that performs hardware initialization during the startup process to fail to recognize the startup process, ultimately causing the Mac to fail to start.
At this point, you may need to recover important data from your Mac. Using professional data recovery software will be the most reliable option. Among numerous data recovery software, Geekersoft Mac data recovery software is the most convenient and effective option for recovering all lost data when the Mac fails to start. Geekersoft Mac data recovery software, with tens of millions of users, is currently one of the most popular Mac data recovery tools in the world. The data recovery software provides a detailed instant preview of the recovery content after scanning, so that users can more targeted recover specific data rather than blindly recover all data, which is very user-friendly and improves the efficiency of data recovery. Geekersoft Mac data recovery software can connect and recover data from almost all types of portable devices, computers, and other devices. By installing Geekersoft Mac data recovery software, you have the opportunity to recover important lost data.
Stage 1 Creating bootable media on a Mac
Step 1 Download, install, and launch Geekersoft Mac data recovery software.
Step 2 To recover data from a Mac that cannot be started, you need to first create a bootable media.
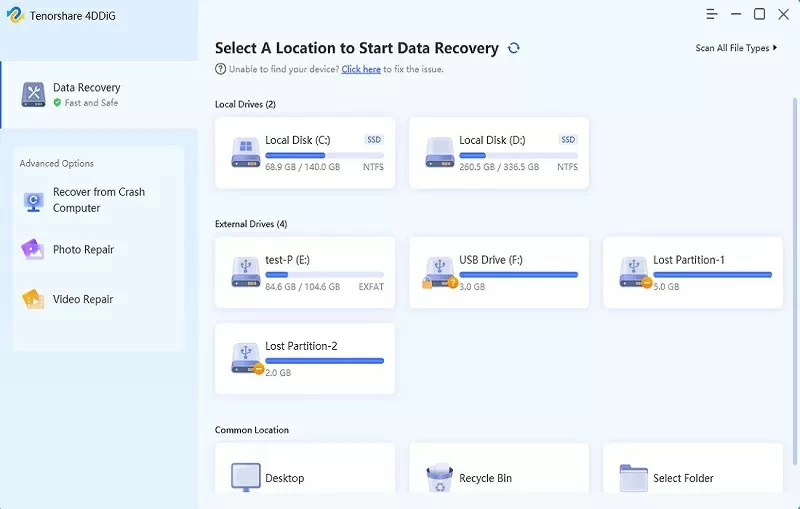
Step 3 Select the correct data recovery option in the Geekersoft Mac data recovery software. For Macs that cannot be started, select the "Computer Crash Recovery" option.
Step 4 Click Start to start the recovery process.
Step 5 Select the "Create USB Bootable Drive" option and click "Create" to proceed to the next step.
Step 6 The software will prompt the user to format the USB drive, please click "Format".
Wait for Geekersoft Mac data recovery software to format the USB drive, and then create a bootable drive.
After successfully creating a bootable drive, follow the prompts of the Geekersoft Mac data recovery software.
Stage 2 Use Geekersoft Mac Data Recovery software to recover data on a crashed Mac device.
Step 1 When starting the Geekersoft Mac data recovery software, select the location to scan. For a Mac that cannot start, choose the Mac's internal hard disk (Macintosh HD) instead of any other connected portable data storage device.
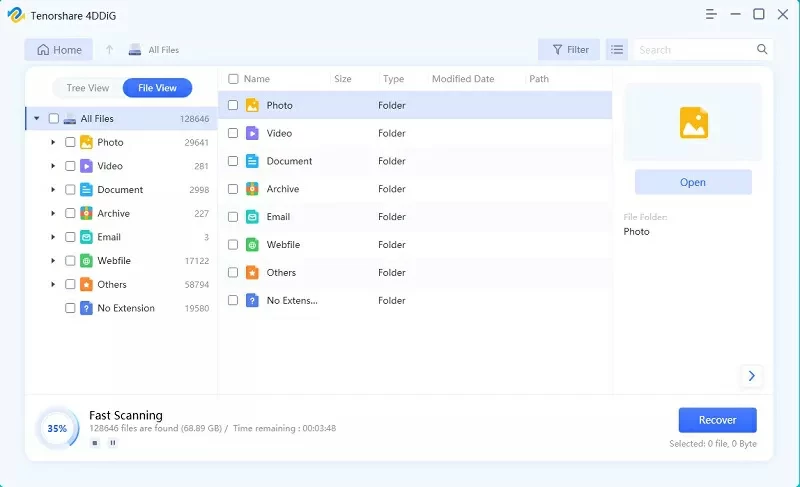
Step 2 Click the "Start" button and the Geekersoft Mac data recovery software will automatically retrieve the lost Mac data for you.
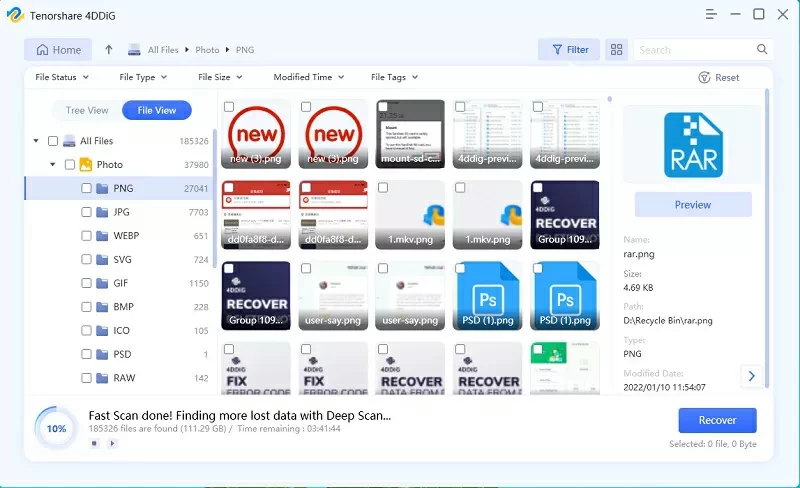
Step 3 After the scan is complete, you can view all scan results and preview the retrieved content. After you have identified and selected the data you want to recover, click the "Recover" button to save the file to a safe location.
When your computer crashes and data is accidentally deleted, don't worry. Geekersoft Mac data recovery software is the most convenient and reliable option for retrieving lost data from your computer.
Launching MacOS from a USB flash drive provides a viable solution for users when the Mac installer crashes. The method for creating a bootable drive described in this article can help you easily start your Mac. In the future, if you want to upgrade macOS from a bootable external source, you can also refer to this article. If the crashed Mac loses valuable data, we recommend that you use Geekersoft Mac data recovery software to effectively recover the lost files. Geekersoft Mac Data recovery software guarantees maximum possible data recovery.